multiviewer-manuals
MultiViewer System Version 2 | User Guidebook
Product Overview, Player Control Panel Manual & Maintenance Guide
Revision: 1
Copyright: Singularity Designs Oy
Table of contents
- Product Overview
- Player Control Panel
- Overview
- Accessing The Player Control Panel
- First Time Setup
- Connecting a Player Host
- Site & Kiosk Players
- Creating a layout
- Editing layouts
- Adding a view
- Editing views
- Detaching & Deleting
- Maintenance
- Common problems and solutions
- Accessing the underlying Operating System
- How to know if the Player Host is running
- LG TV Grid
- Creating a grid
- Editing grids
- Sending commands
- Commands reference
- Master commands
- Scheduling
- Maintenance
- Command execution issues
- Ideal maintenance conditions
- Settings
- Player Management
- Theming
- Account Management
- Creating a new account
- Editing accounts
- Managing your own account
- Managing other accounts
- Deleting an account
- Permissions
- Login with Microsoft
- First time setup
- Configuring permissions
- Flags reference
- Permissions reference
- Integrations
- Additional Information
Product Overview
Multiviewer System Version 2 is a simplified, lightweight and performant on-line digital signage solution for displaying passive and touch controlled web content. Display websites, image collages and documents through an instantly updating network of configurable Windows-based Player Hosts.
Available Features
MultiViewer System Version 2 is network based. It allows you to have many Player Hosts (regular Windows computers, which display the digital signage content) anywhere you can connect it to the network Player Hosts connect through direct socket connections to the Backend Host, which allows the near realtime propagation of any changes made through the Player Control Panel.
All software for the MultiViewer System Version 2 run on Windows computers, so building out your infrastructure is easy and compatibility is not a hassle.
MultiViewer System Version 2 Player Hosts can passively display websites, PDFs and images. They can also be configured to act as touch kiosks, which can display websites from the local network or from the internet, in a locked down environment and easy to use user interface. A single Player Host can be connected to any number of displays, which can display any kind of content, if sufficient hardware is available.
MultiViewer System Version 2 includes a Login With Microsoft integration, so users can use their work accounts to login to the Player Control Panel to manage the Player Host network. Account management can also be done with local accounts configured in the Player Control Panel. Permissions for Microsoft or AD accounts, is done with Application Roles, which can be easily assigned to any user or group in your Azure Active Directory environment.
MultiViewer System Version 2’s Player Control Panel user experience can be greatly configured through permissions. Regular users will only see the controls that are relevant to them and power users can be treated to a whole suite of buttons and nobs.
MultiViewer System Version 2 features the LG TV Grid integration, which allows authorized users to control LG TVs without a remote through the Player Control Panel. TVs can be assigned default settings and be scheduled to set those defaults at the desired times of day. The Player Control Panel allows you to schedule when the TVs should be on and disable IR controls to tackle abuse or accidental controls to the TV.
Infrastructure
MultiViewer System Version 2 is network based. The Backend Host provides the Player Control Panel and manages all Player Hosts, that display the digital signage content or act as touch kiosks.
All devices in the network communicate through WebSocket and HTTP connections. Specifically through ports 80, 433 and 7080.
The Backend software is lightweight and easy to run. Player Hosts should use the appropriate hardware depending on the display resolution and the number of display to achieve smooth playback of content.
Player Control Panel
Overview
The Player Control Panel is a Single Page web Application (SPA), which means you’ll be able to access everything from the same web page. The following image is the application main screen.
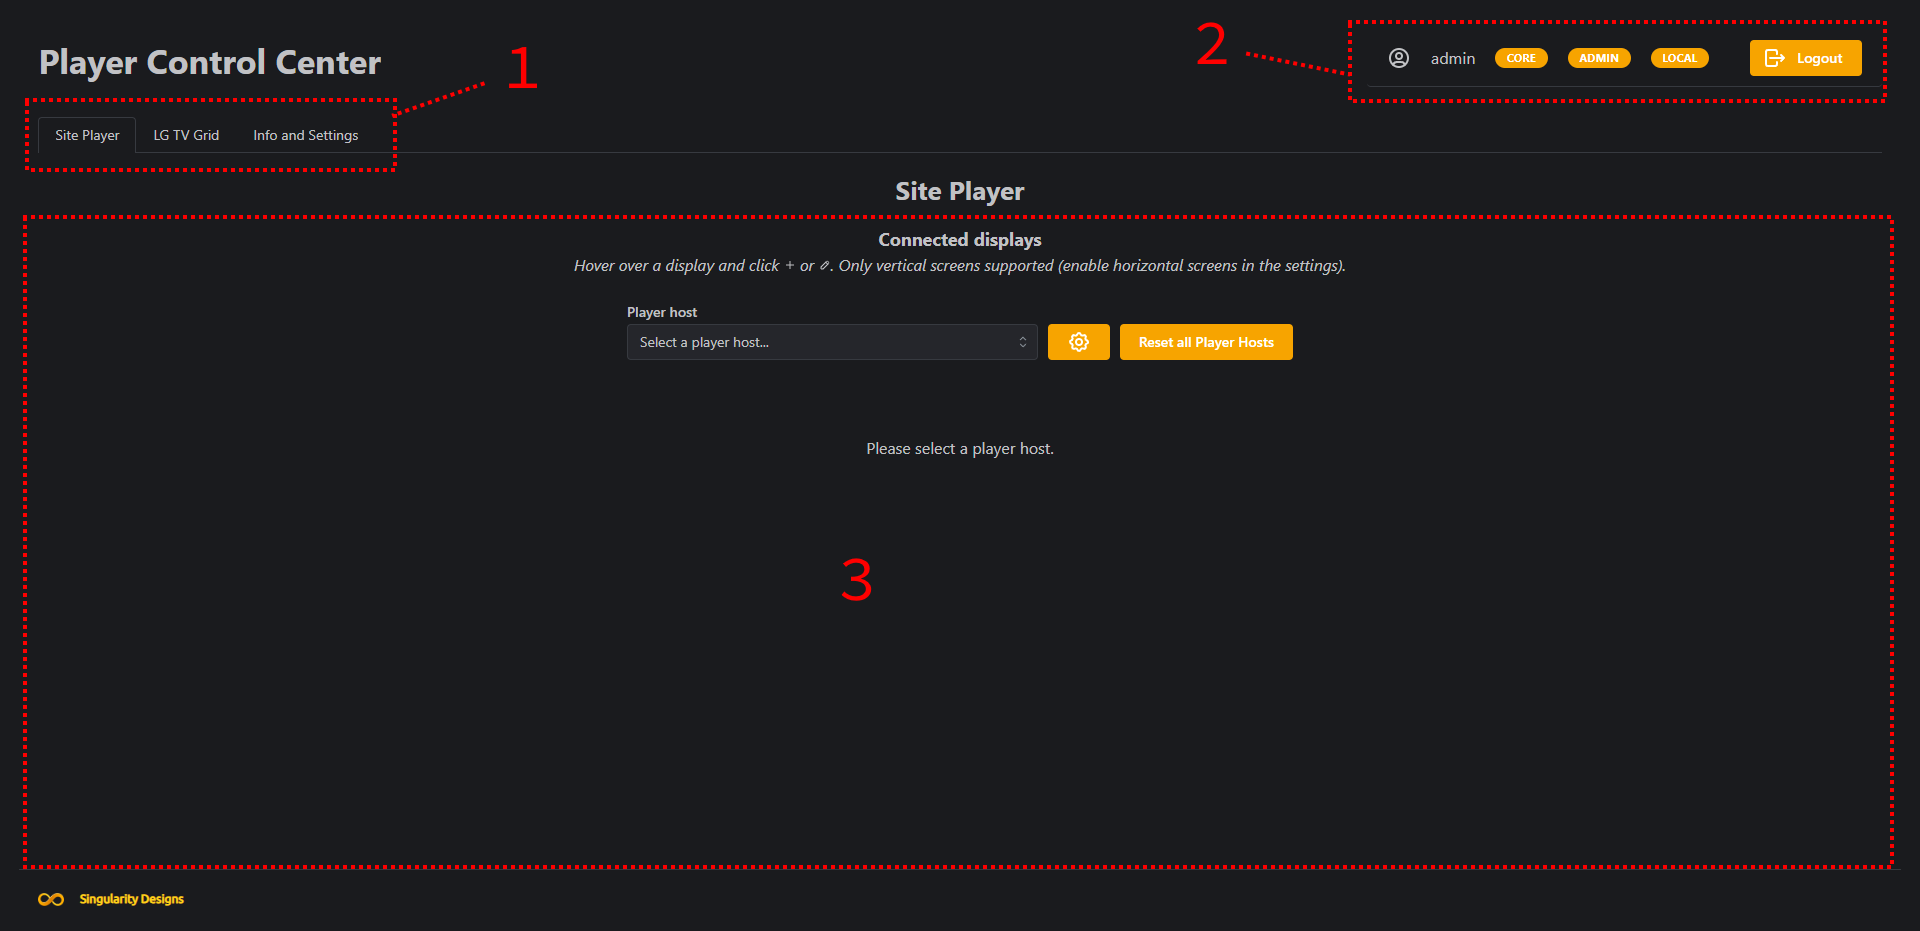
On the main screen, you can navigate to different tabs by using the navigation panel on the top (1). Some tabs might be unavailable depending on account permissions.
General account information is displayed in the top right corner on the main screen (2). From there you can see the logged-in account’s username and some account flags (see Flags reference below for more details)
The selected tab’s main content is displayed right in the middle of the main screen (3). Most of your interactions with the Player Control Panel will be from this area.
Accessing The Player Control Panel
The Player Control Panel is the way users and administrators can manage the MultiViewer System Version 2 network. The panel acts as a dashboard to inspect the network’s status and to configure it. In short, the panel will be your main way to do anything MultiViewer System Version 2 related.
To access the Player Control Panel, consult your company’s IT-support to get the appropriate URL to access the Player Control Panel in your browser.
Usually the Player Control Panel URL follows this format:
http://<company>-portti.singu.fi
When you first open the Player Control Panel, you’ll see something like this:
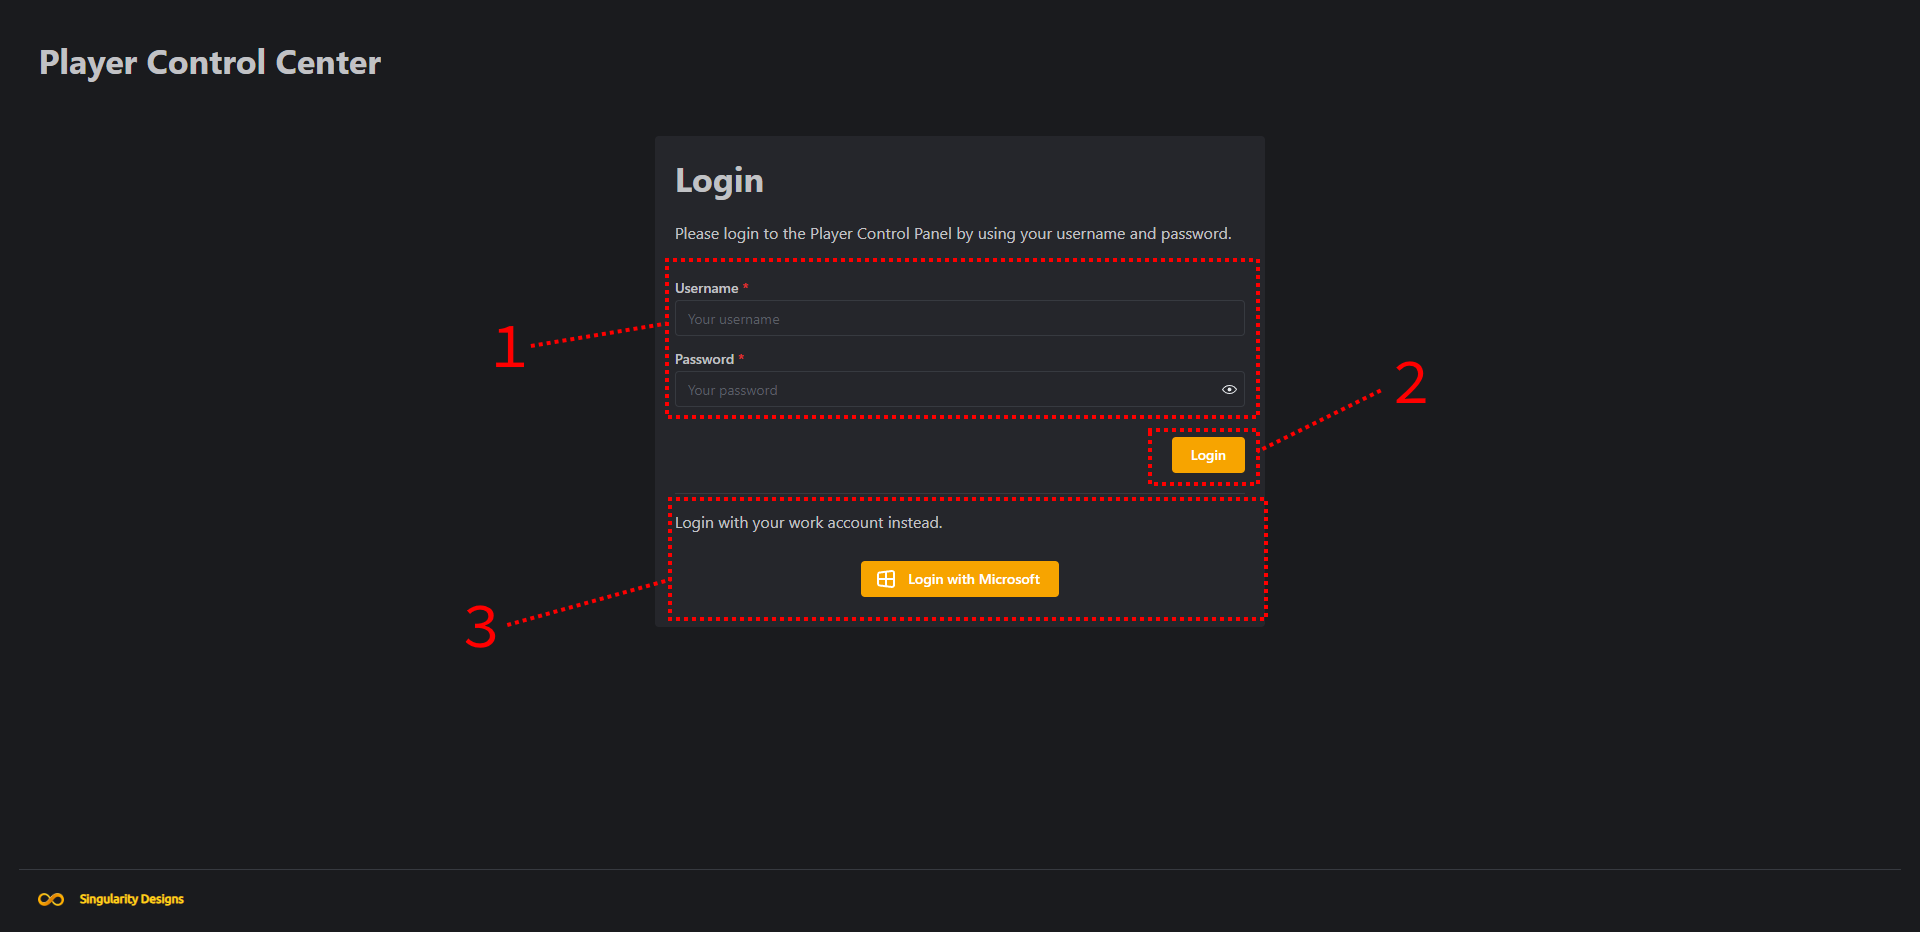
The first thing you see is the login screen. On the login screen, you can enter Local account credentials (1) and login with it (2). You can also choose to login with your Microsoft (Active Directory) Account (3), if it’s available (if it’s not available, the button won’t be displayed). Choosing to login with your Microsoft account will redirect you to Microsoft’s own page to login.
If you are logging in for the first time, you can login to the Local admin account without a password to configure your instance of MultiViewer System Version 2. After logging in you should set an account password through the settings.
First Time Setup
Before following this guide you should first read Accessing The Player Control Panel.
Step 1
Make sure you have set the Local admin account password.
To change the password this, go to the Settings tab and under the Account Settings category click on My account to access account settings. On the very bottom of the account settings, follow the instructions under Change my account password.
Step 2
Install the MultiViewer System Version 2 to automatically start on system startup.
To install to startup, go to the Settings tab and under the System Settings category click on Installation Management. The installation management page has only a single toggle to change the installation status. Turn it on to install to startup.
When you have successfully installed to startup, the installation status will be the following in green text: Installed and up to date!
You have now completed the First time setup. If you want to connect your first Player Host, keep reading.
Connecting a Player Host
To connect a Player Host you need to be logged in as an account with administrative privileges (either admin permission or player-manage, player-manage-authorization and player-manage-security permissions)
Step 1
The first step is to install and configure the Windows computer that will act as the Player Host to:
- Automatically login on startup.
- (optional) Automatically hide the task bar and set a plain desktop background.
- Disable notifications from Windows settings.
- (optional) Configure the computer to automatically power on when connected to AC from the BIOS.
- (for kiosks) Disable EdgeUI (side panels).
- (for kiosks) Enable touch keyboard in Windows tablet settings under “When I’m not using tablet mode” and make sure desktop mode is otherwise always enabled.
Step 2
Now we are going to install the MultiViewer System Client software. The software is shipped as a .zip archive, which includes the following files:
MultiViewer Client Setup.exe, the installer executable.<build-number>.nupkg, this file can be ignored, but needs to be unpacked!RELEASES, the releases file used for version control.
To install MultiViewer Client:
- Unpack the whole
.ziparchive in an empty folder. - Run the installer
.exeexecutable. - Wait for the installer to complete.
Step 3
The next step is to reboot your system to make sure the installation and system configuration was a success. If everything is properly configured, the computer should automatically login and after some time you should see the following setup window:
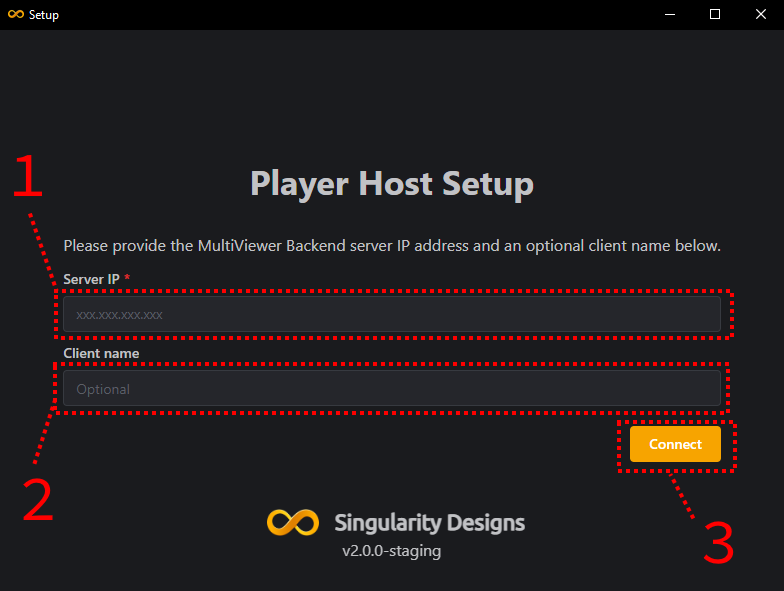
In this window you will first input the MultiViewer System Server’s IP address (1) and an optional client name for your new Player Host (2). Then press the Connect button (3).
If you get an error that says: “The Server is not accepting new clients”, “Permission denied” or similar, make sure the Allow new players to connect setting is enabled in Player Management settings.
Step 4
After the connection has been established, the setup window will close and the Player Host will be immediately ready to go.
To add a layout refer to Creating a layout (TODO: Add link)
Settings
Player Management
Subject to change.
Preview:
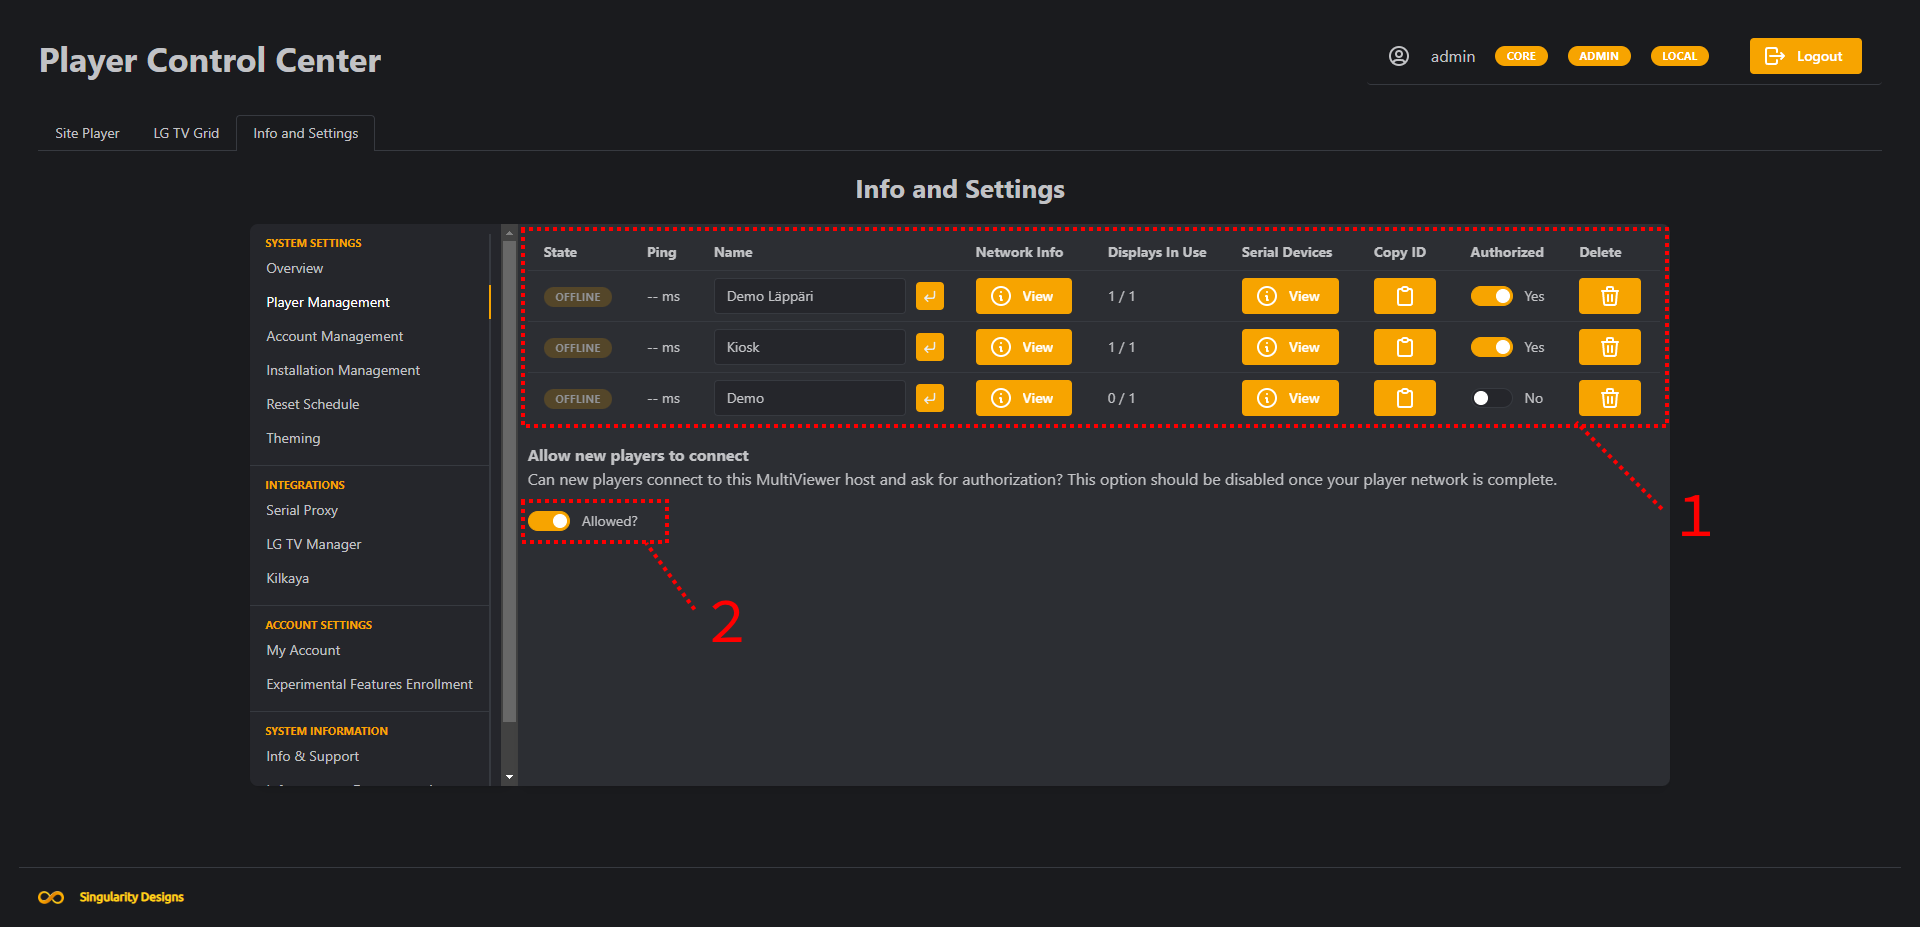
In the Player Management settings, you can view player information, control Player Host authorization, edit Player Host names and event delete Player Hosts from the network (1).
Player Host network and serial device information can be revealed by clicking the corresponding “View” buttons.
Player Host network information includes:
- IP address
- MAC address
- Hostname
Player Host serial device information includes (for each connected device):
- Device name
- Device port address (COMx)
- Device manufacturer
You can also allow or disallow new Player Hosts from joining the network (2).
To access the Player Management settings, you need the player-manage permission.
This permission has sub-permissions for specific tasks in the Player Management settings.
For more details refer to the Permissions reference.
Theming
Preview:
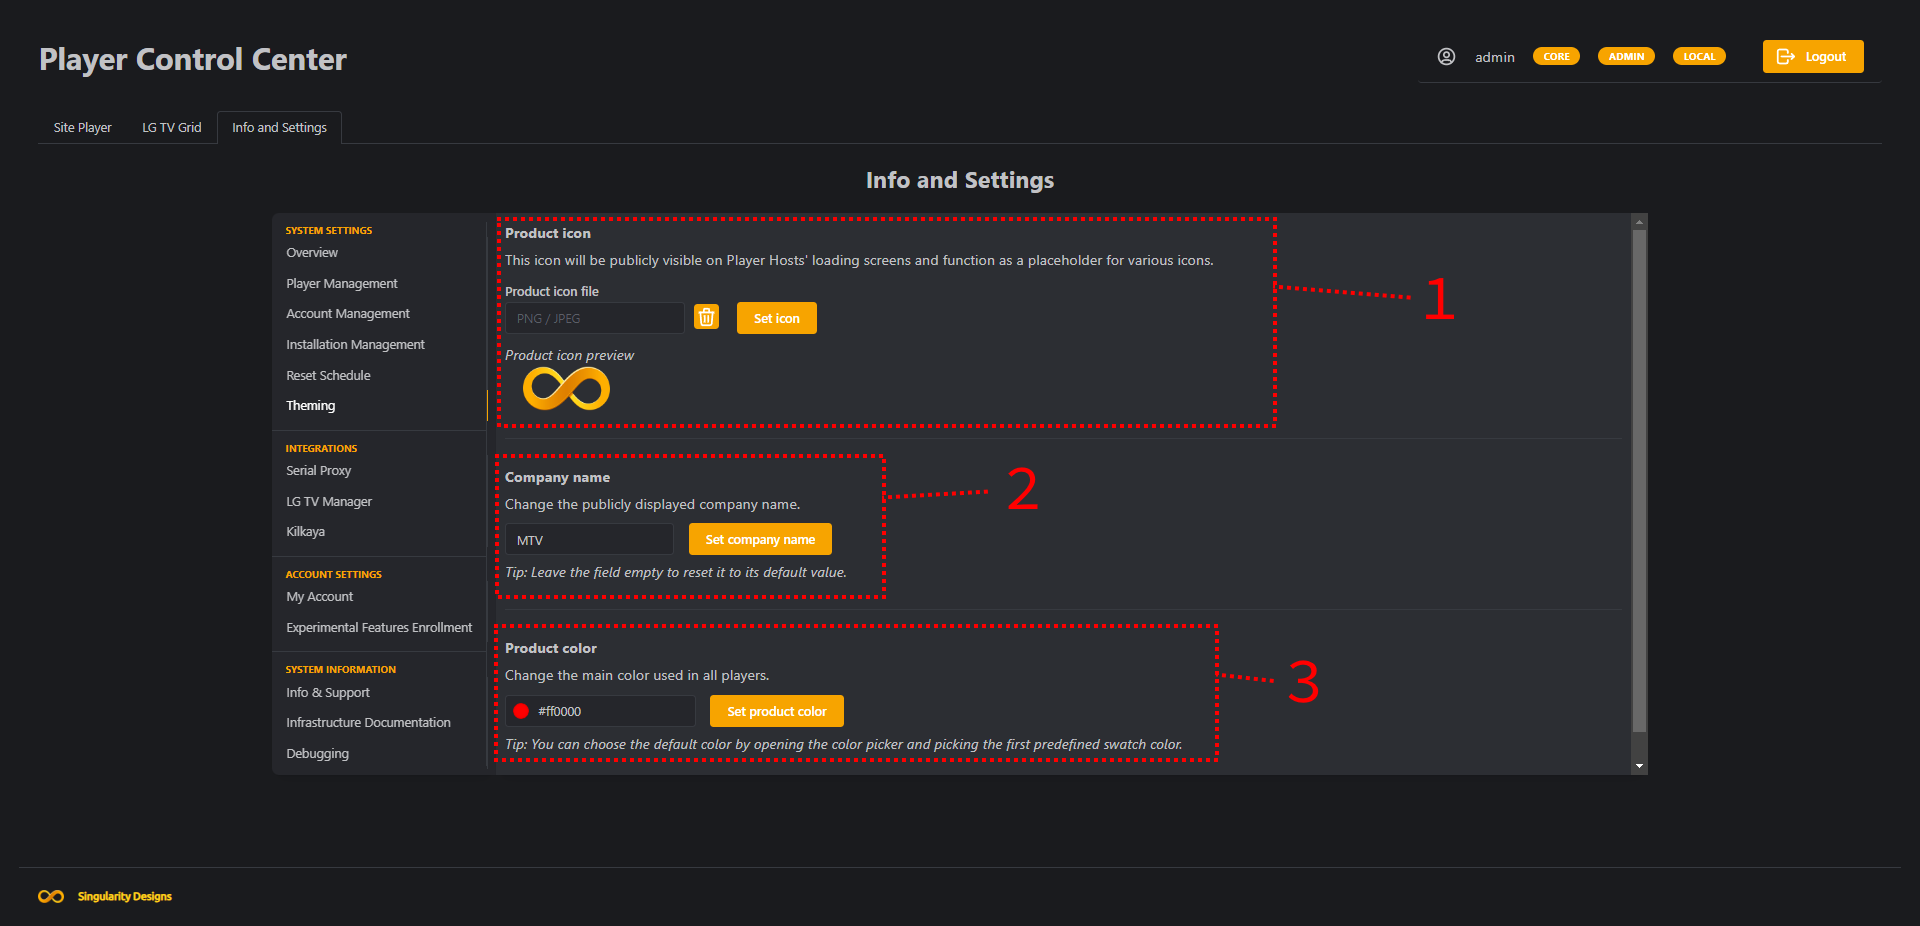
The theming settings allow you to change the public facing branding of MultiViewer System Version 2. You can change the product icon (1), the company name displayed along the product icon (2) and the highlight color used (3) in the company title and user interfaces.
Changing the theming settings does not affect the branding or other theme settings in the Player Control Panel.
To access the theming settings, the theming permission is required.
Account Management
Preview:
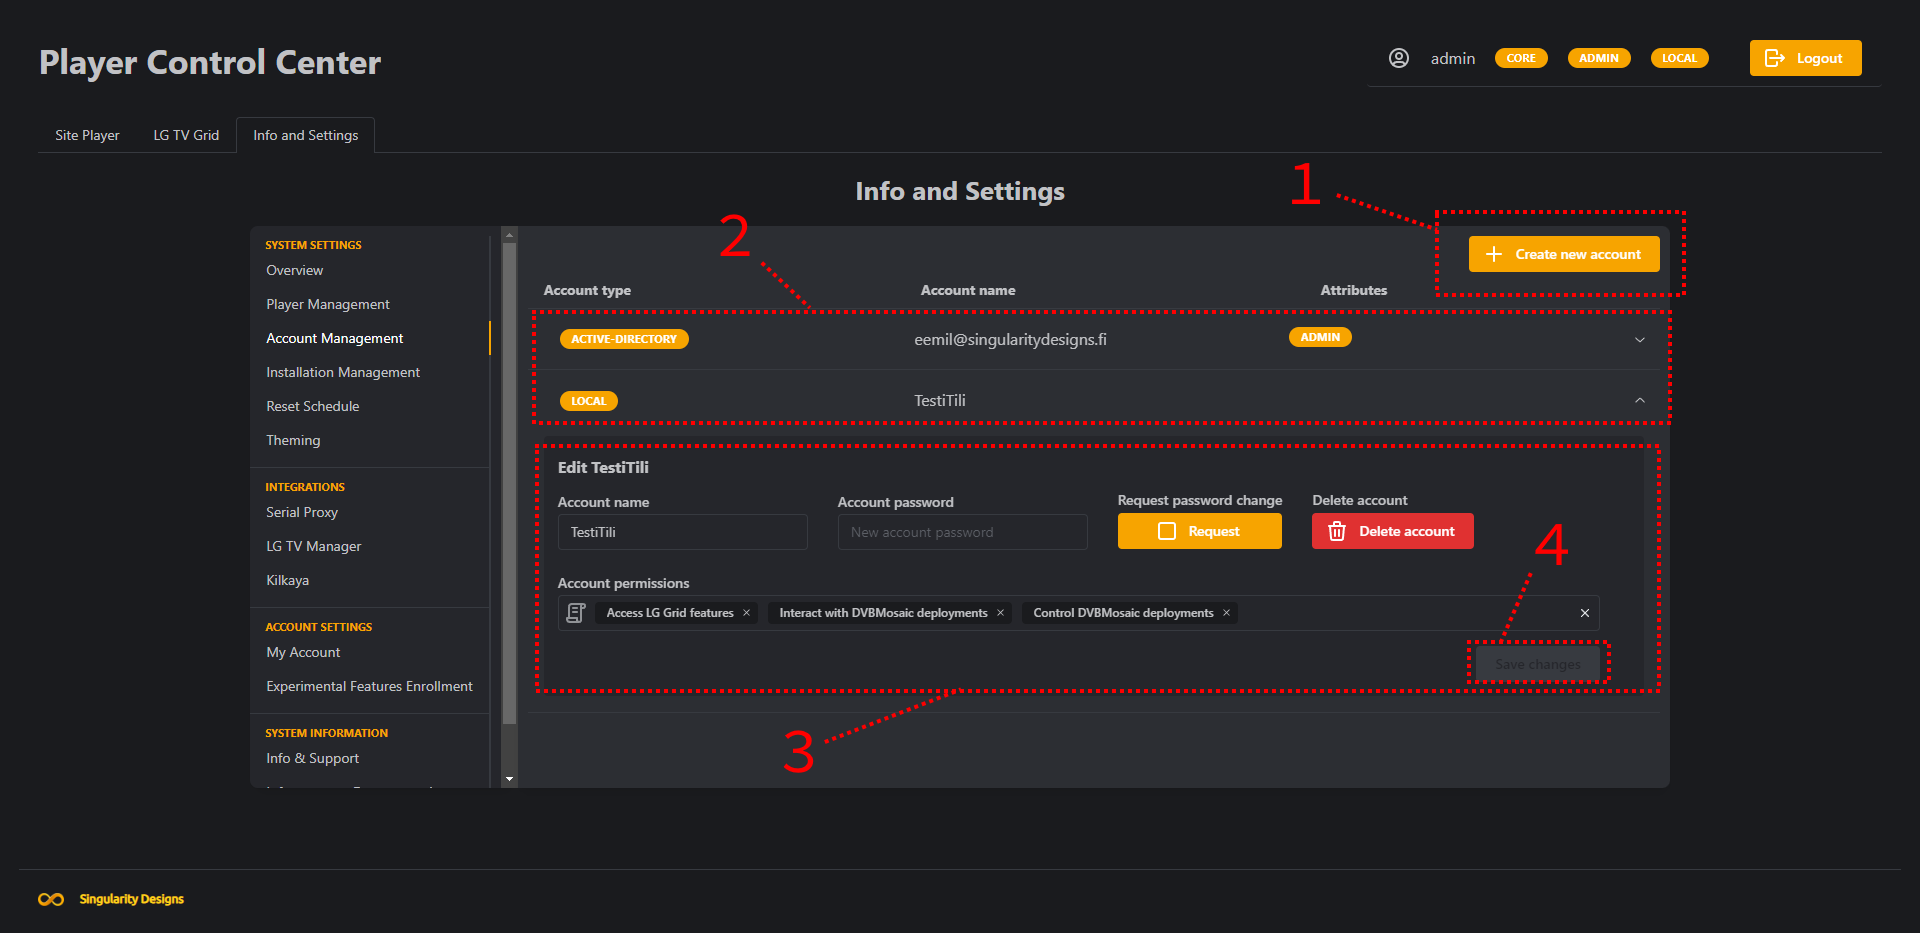
In the Account Management settings you can create new local accounts (1). Only these local accounts are managed through the Player Control Panel, all others are managed from their respective platforms (e.g. active-directory accounts are managed from Azure AD). However, some management controls such as deleting an account are available for every type of account.
Accounts are listed in a table (2), from which you can reveal the account management panel (3) for each account by clicking on it’s row. From the account management panel you can (depending on your account permissions) edit the account name, password, request a password change for the account, delete the account and manage the account’s permissions.
If you make changes to an account, you must save your changes (if you want them to be saved) before closing the account management panel by clicking on the “Save Changes” button (4), which will become available once changes have been made.
Creating a new account
To create a new account you need to be logged in with an account with administrative privileges or with the account-manage permission (subject to change). Once you have the required permissions, follow the steps below:
- To begin the account creation process click on the “Create a new account” button in the Account Management settings (1)
- You will now be presented with the following popup to set your new account’s name and permissions:
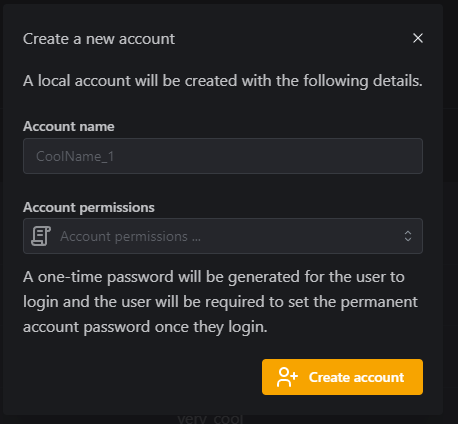
- After all details are filled in, click on “Create Account” on the bottom right of the popup.
- You will now be presented with a one-time use password popup for your new account. You should save this password immediately, as it will not be shown again:

That completes account creation.
Flags reference
core: Local Admin account. Cannot be removed.admin: Account has all permissions (The admin permission).local: The account type is local (Locally managed).active-directory: The account type is active-directory (Externally managed).
Permission reference
all: Administrator (full access).account-manage: Manage accounts.account-force-password-change: Force an account to change their password.account-change-own-name: Change your account name.account-change-other-name: Change another account’s name.account-change-other-password: Change another account’s password.account-change-own-password: Change your account password.account-delete: Delete accounts.account-manage-permissions: Change other account’s permissions.site-player: Access Site Player features.site-player-detect: Request detection of new Site Player displays.site-player-edit: Edit Site Player configurations.site-player-reset-all: Request all Site Players to reset.player-manage: Access Player Host management.player-manage-edit: Configure Player Hosts.player-manage-delete: Delete known Player Hosts.player-manage-authorization: Change Player Host’s authorization state.player-manage-security: Manage Player Host security policy.player-manage-network-info: View Player Hosts’ network information.mosaic: Access DVBMosaic features.mosaic-edit: Edit DVBMosaic configurations.mosaic-interact: Interact with DVBMosaic deployments.mosaic-control: Control DVBMosaic deployments.settings-scheduled-reset: Access system scheduled reset settings.lg-grid: Access LG Grid features.lg-grid-edit-schedule: Edit LG Grid scheduled resets.lg-grid-edit-grid: Edit LG Grid deployments.lg-grid-master-controls: Access LG Grid master controls.serial-proxy: Access Serial Proxy features.serial-proxy-execute: Execute Serial Proxy commands.integrations-manage: Access integrations’ settings.kilkaya-credentials-edit: Edit configured Kilkaya credentials.installation-management: Manage system installation.theming: Access system theming configuration.
Additional Information
How to disable Windows side panels
This can be achieved through a registry change. This requires administrative privileges on the local system.
- Create a new key(s) with the following registry path:
HKEY_LOCAL_MACHINE\SOFTWARE\Policies\Microsoft\Windows\EdgeUI - Create a new value with the type DWORD32 in the key we just created.
- Make sure the value is set to
0and the type ishex. - Reboot.
You can also do this with this handy CMD script, just don’t forget to reboot:
reg add HKEY_LOCAL_MACHINE\SOFTWARE\Policies\Microsoft\Windows\EdgeUI
reg add HKEY_LOCAL_MACHINE\SOFTWARE\Policies\Microsoft\Windows\EdgeUI /v AllowEdgeSwipe /t REG_DWORD /d 0
If layouts cannot be added to horizontal displays
Some staging versions of MultiViewer System Version 2 require the user to have the Experimental Support for Horizontal displays setting enabled.
To enable experimental horizontal display support, go to the Info & Settings tab and select Experimental feature enrollment. Then toggle Experimental Support for Horizontal displays on.
Support
Singularity Designs support can be reached through:
- support@singularitydesigns.fi (General support)
- kimmo@singularitydesigns.fi (Product Manager)
- eemil@singularitydesigns.fi (Product Lead Developer)